Function
An ultra-precise and dynamically neutral tool holding is required to use the potential of an Ultra-Precision tool spindle. Hence DIN 69893 compliant and commercially available HSK tool holders are suitable to only a limited extent with our tool spindle.
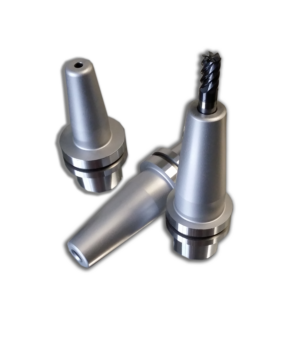
By using our highly specialized manufacturing – which includes our spindle solutions – and innovative balancing methods, we were able to develop and manufacture our HSK tool holding solution UTS-x. In compliance with DIN 60893 and for the first time, the Ultra-Precision HSK tool holding with the following properties can be offered to our customers: *):
- Static Tool Run-Out: < 0.8 micron
- Balancing Quality: G0,3 mm/s at 60.000 rpm
- Repeatability, axial/radial: < 0,2 µm
While tool run-out is reduced by 70%, balancing quality is even more than 25 times better than the industry standard.
Hence our slogan: “Ultra-Precision meets Industrial Grade“
*) if used with Levicron tool spindles ASD-H25/A, UASD-H25/A, UASD-H40
Interface / Compliance (DIN):
Tool Clamping:
Available for Tool Shank Diameter, metric:
Available for Tool Shank Diameter, imperial:
Guaranteed Tool Run-Out *):
Guaranteed Balancing Quality *):
Repeatability *):
*) if used with Levicron tool spindle ASD-H25/A, UASD-H25/A, UASD-H40
HSK-E, DIN69893-E
Thermal Shrinking
8 mm, 6 mm, 4 mm, 3 mm
1/4″, 1/8″
< 0.8 micron
< G0.3 mm/s at 60,000 rpm
< 0.2 micron
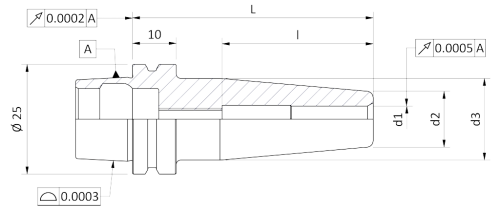
| Order number | Taper | d1 (for h5) | d2, mm | d3, mm | L, mm | l, mm |
| *) 901.857 | HSK-E25, DIN 69893 | 8 | 15 | 22 | 55 | 45 |
| *) 901.6A0 | HSK-E25, DIN 69893 | 6 | 12.5 | 18.6 | 80 | 34.5 |
| 901.655 | HSK-E25, DIN 69893 | 6 | 12.5 | 18.6 | 55 | 34.5 |
| *) 901.4A0 | HSK-E25, DIN 69893 | 4 | 10 | 15.2 | 80 | 30 |
| 901.444 | HSK-E25, DIN 69893 | 4 | 10 | 15.2 | 50 | 30 |
| 901.233 | HSK-E25, DIN 69893 | 3 | 9 | 13.5 | 45 | 26 |
| 901.755 | HSK-E25, DIN 69893 | 1/4" | 12.5 | 18.6 | 55 | 34.5 |
| 901.333 | HSK-E25, DIN 69893 | 1/8" | 9 | 13.5 | 45 | 26 |
*) only on request
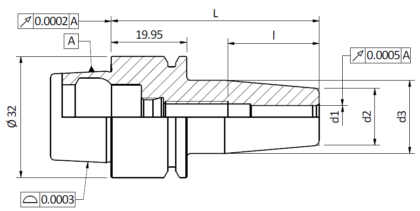
| Order number | Taper | d1 (for h5) | d2, mm | d3, mm | L, mm | l, mm |
| 902.230 | HSK-E32, DIN 69893 | 3 | 7.7 | 11.2 | 45 | 12 |
| 902.440 | HSK-E32, DIN 69893 | 4 | 10.2 | 14.4 | 50 | 18 |
| *) 902.4A0 | HSK-E32, DIN 69893 | 4 | 10.2 | 17 | 80 | 18 |
| 902.650 | HSK-E32, DIN 69893 | 6 | 15.2 | 19.4 | 55 | 25 |
| *) 902.880 | HSK-E32, DIN 69893 | 8 | 20 | 25 | 80 | 34 |
*) only on request
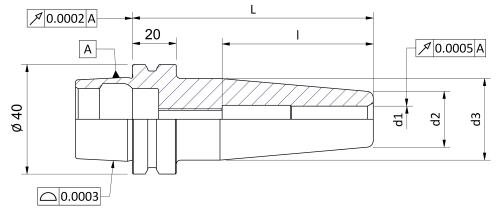
| Order number | Taper | d1 (for h5) | d2, mm | d3, mm | L, mm | l, mm |
| 903.8A6 | HSK-E40, DIN 69893 | 8 | 12.5 | 18.6 | 80 | 34.5 |
| 903.655 | HSK-E40, DIN 69893 | 6 | 10 | 15.2 | 55 | 30 |
| 903.444 | HSK-E40, DIN 69893 | 4 | 9 | 13.5 | 45 | 26 |
*) only on request
- Tool Clamp Accuracy and Repeatability
Our highly specialized manufacturing allows us to guarantee a spindle taper run-out of under 50 nm. The same manufacturing technology is used to machine our Ultra-Precision HSK tool holders UTS-x for which we guarantee a tool run-out of under 0.8 micron and a balancing quality of better G0.3 mm/s at 60.000 rpm.
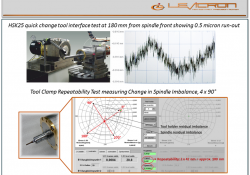
The picture on the right shows a tool run-out measurement of our ASD-H25 at a customer site and at 185 mm in front of the spindle nose. A measured value of below 0.5 micron confirms the quality and combination of our HSK tool interface and spindle taper.
As a standard test the tool change repeatability of every spindle is tested by our 4 x 90° reversal balancing test at top speed (lower picture). For this the residual imbalance of one of our UTS-x HSK tool holders is measured at 0°. Then the resdidual imbalance is measured after the holder was rotated by 90° against the shaft. This done three times. The distance from the midpoint of the resulting square to one of its corner represents the tool clamp repeatabilty where the imbalance is defined as an eccentricity of the tool holder mass. With this method we can guarantee a tool clamp repeatability of less than 0.2 micron.


